Click Here For Free Blog Templates!!!
Blogaholic Designs

Pages

About

Tuesday, June 26, 2012

Combing Wool for the Wheel


Hello!  I'm way overdue for a new posting here.  Life has been a bit, well, HECTIC. So I realized that I still needed to show how I prepare clean dyed fiber for the spinning wheel.
There are some out there who take the locks of fiber directly and spin them from there.  No way, Jose!  You'll most likely have knotted/felted areas, bits of debris...not for me personally as this is hard to work with.  There are predominantly two ways to get your wool/fiber ready to spin after it's been cleaned, carding and combing.  Each method produces a different type of yarn when spun.  Carding produces fibers going in every which way that are spun into woolen yarns.  These yarns have a lot of air between the fibers and have a soft springy feel to them.  These yarns are used for garments and most day to day projects.  Combing produces fibers lined up parallel to each other and are spun into worsted yarns.  Now I should say there is a yarn weight called worsted also, but they are two separate things.  Yarns spun worsted style show off the natural luster of the fibers and are quite strong.  This type of yarn is good for hardwearing items and garments. They are well suited for weaving, too.  I personally use large English Combs.  They are big, sharp, and potentially very dangerous if not used correctly.  I make sure my kids are either asleep or secure in the next room when I'm working with them.  Now, I do have hand cards and I do use them from time to time.  Here is a really good link showing how to use hand cards.   If I have short fibers to work with, my hand cards just work better.  Now to start, I anchor the combs to a table using C-clamps.  Here you can see what the combs look like.
 Like I said...big and sharp!  Each comb has a large wooden guard that stays on the sharp tines when not in use.  Now you take your locks of fiber and lash them onto the anchored comb.  This is called the stationary comb.  Here is some Lincoln Longwool fiber from Gandalf that I dyed with Kool-Aid and food colors.  You can see how I do this here.  You want to make sure you're lashing the fiber on from the same direction.  I always lash on the butt end of the fleece.  This is the end that was closest to the animal when it was shorn off.  Fill the comb all the way across and about 1/3 of the way up the comb.  Much more than this and it can be difficult to work the fleece well. 
Now you turn the stationary comb so the tines are pointed to the right.  You take your other comb and VERY CAREFULLY swing it downward starting at the outside edge of the fiber.  With each pass you pick up more and more of the fiber and you move closer and closer towards the stationary comb.  Once you have transfered the fiber from the stationary comb to your moving comb it's time to transfer the fleece back to the stationary comb.   
 You VERY CAREFULLY swing the moving comb from right to left starting at the outer edge of the fiber.  Again, with each pass you'll be transfering more and more of the fiber to the stationary comb.  Repeat these two steps until the fleece is nice and open and clean.  
Turn your stationary comb so the tines are pointing up again like they were when you started.  Smooth the fiber with your hands to bring the fleece to a point.  Now you'll be pulling off the fleece to form top.  Top is what you spin.  It's a long continuous strip of combed fiber.  
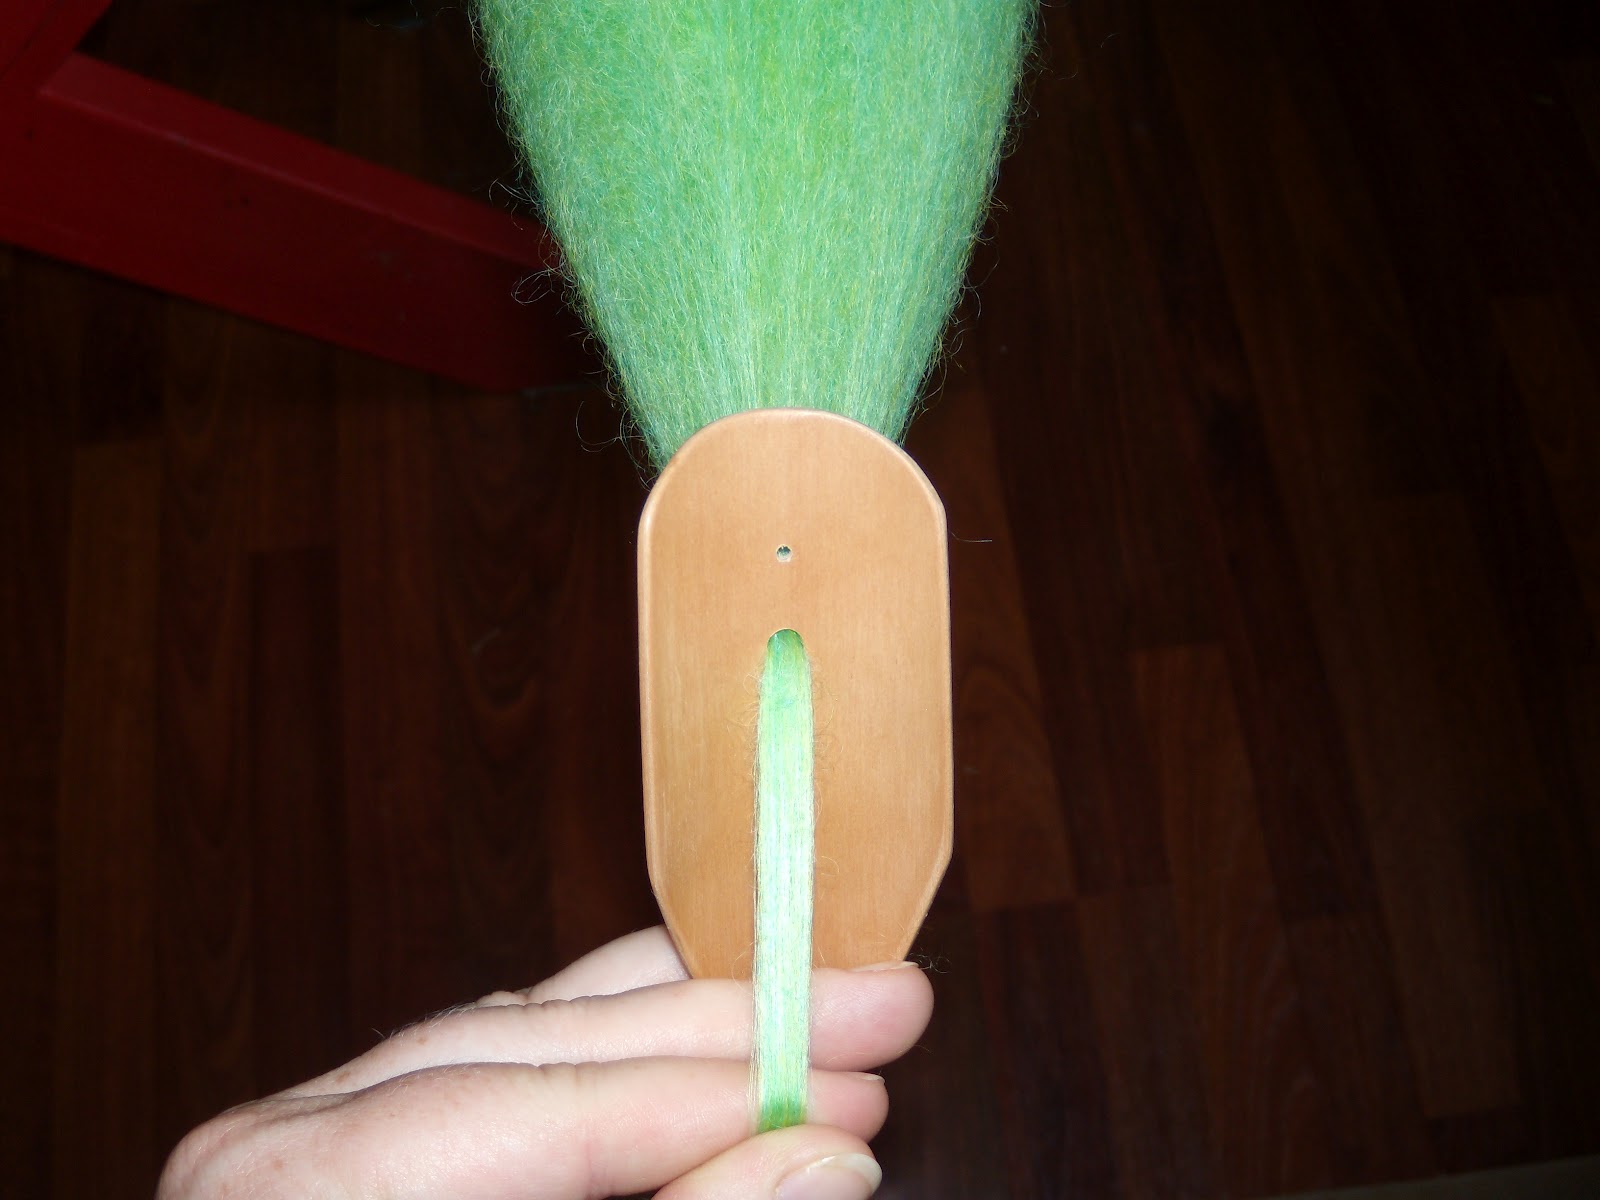
From here you can either pull the fleece off to form top completely by eye, or you can use a diz.  A diz is a small device made from many different materials...wood, plastic, cardboard, even stone.  I've seen a lovely one made out of Mother of Pearl before.  The diz has a hole in the center that helps you to pull off the top more evenly.  As you pull the fleece through you move the diz closer to the stationary comb.  The longest and strongest fibers will be pulled through while the short fibers, noils, dirt and debris will be left behind on the stationary comb.  Now, I was taught that you waste nothing when it comes to your fiber.  I take the "trash" fiber that's left behind and clean it up by hand to use for our felted soaps!  It's a great way to use wool or other fiber that would otherwise probably end up in the trash.
Once you've pulled off all the fiber you'll have a nice long strip of top that's ready to be spun into lovely worsted yarn!  I gently roll the top around my hand to make a nice and tidy "ball" of top that easily unrolls as I use it at the spinning wheel.
Now all I need to do is get Matthew to take some pictures of me spinning so I can explain how that part of the process is done!  It's hard to get decent photos of yourself while spinning.  Believe me, I've tried.  I promise to have that sometime soon!

Thursday, June 7, 2012

Getting the Garden In!

We have been pretty busy around here getting the gardens prepared and planted.  I feel like there are just never enough hours in the day to accomplish all that needs done.  I know I'm not alone in this feeling!  Every year once May and June rolls around it just seems like everything else comes to a giant halt and the main goal is to get things planted and maintaining the gardens.  A lot of what we produce I preserve by canning and freezing for us.  We try to produce and save as much of our own food as we can.  The rest, which is still a large amount on a good year, goes to market with us on Saturdays.  We decided to stick to more of what we always grow.  The old saying "If it ain't broke don't fix it." comes to mind!  Multiple varieties of heirloom tomatoes, squash, green beans, cucumbers, and sweet/hot peppers can all be found growing, as well as some other wonderful vegetables.  This year I was able to get my hands on the infamous Bhut Jolokia or Ghost chili pepper seeds.  This is apparently one of the hottest peppers known and comes from the region around India.  We also have Fatalii and Carribean Red Habanero Peppers this year, too.  We seem to have this thing about really hot peppers.  I mean, yeah we're chili heads, but come on!!  If you like it hot, come see us at market and we can fix you up!
Getting the gardens prepared is no small task.  This year we invested in a moldboard plow to really help dig deep and get the rich soil turned over.  It also seems to have helped bury a lot of the weed seeds.  We try to avoid plowing/tilling too much as we don't like to disturb the soil ecosystem anymore than we have to, but we do give it a good going over at the beginning of each season.  Here is my brother Josh breaking in the plow.  It was like he had done it one-hundred times before!
A week later Matthew went over the turned over soil with a walk-behind tiller.  This was a massive undertaking.  The moldboard plow leaves giant mounds and dips of soil that need to be smoothed out.  Matthew certainly got a good workout fighting his way through it all.
Ronan had a great time playing in the freshly tilled dirt that day.....
Willow spent the entire time picking "flowers."  In this case it was some type of yellow-flowered weed that was blooming like mad.  I told her she could pick all of the yellow flowers she wanted and I tell you what...she picked every single yellow flower she could find!  Here she is with flower smeared on her face and eyes closed for the camera...typical Willow.
 So now we can fast-forward to the last few days.  I've spend many long hours outside getting plants in the ground so they can start growing.  The warmer spring we've had this year has been quite beneficial in many ways, one being that we were able to work the gardens sooner.  Last year I wasn't able to get the tomatoes or peppers in the ground until after June 1 because it was so wet for so long.  The plants were pretty sad by that point and they never did fully recover.  This year I have had some of the best looking transplants I've ever had.  I think this is in no small part due to the generous sun and early mild temperatures we've been blessed with.  This morning when I went to let the chickens out I snapped a couple pictures of what things are looking like now.  Here is what the main garden looks like at this point.  Give it a few weeks there will be a lot more green in this picture as things grow bigger and bigger!
This is a portion of our tomatoes and "greens."  Putting up the tomato tee-pees is always A LOT of work, but we always have the nicest tomatoes when we use this system.  Each stake gets one plant and I just tie the plant up as it grows.  I don't do too much pruning either.  This is just my preference.  I'll sacrifice a little fruit size to have larger yields.  Needless to say I get some sprawling branches despite my best efforts to keep them all up off the ground!
 Here's a lovely young Lacinato Kale plant.  It produces lovely dark blue-green leaves that are just packed with nutrition.
As I was walking out of the garden I spotted this tomato plant with flowers in bloom!!  This is wonderful because it means the first of the tomatoes aren't too far of.  I can not wait...
I like to intermingle flowers in my gardens along the veggie plants.  Some flowers can actually help ward off certain pests you don't want in the garden.  I thought this little lady was just too pretty to not share.  This is an heirloom flower called Zebrina.  Such pretty colors on a easy to care for plant.  Imagine a small version of a hollyhock...

The sheep couldn't help but notice me while I was out and decided to come and say hello.  Well, it was actually more of a "Are you going to give me some sweet feed?" kind of greeting.  They are now permanent additions here I'm glad to say.  Matthew had to get the fencing finished before we were able to move them up here from my mom's barn.  So now the sheep are here and the goats are at her house.  Matthew and I have decided that we do want to get a couple weeder goats just to help maintain the lot.  It's really big for just two sheep!  It's nice to have livestock back here on the farm.  I'll leave you with a picture of my two balls of fluff!  Until next time!
Gandalf and Raziel